


Screenshots
Here are some screen shots of the system in use. This website is an example of the output from XDBCMS.
This is the log in screen - note that all users can have their own login and password - also, if you attempt to open a given page without logging in, you'll be returned here.

This is the first screen, which shows a list of the websites that are known to the system. Click on a name to start working on that website, edit, to change details, such as the URL the website will have, or Add to create a new website.
Clicking on a name will show you the details about the particular website. Click on the 'Page List' tab to show the pages defined within this website.
Note: All the pages have a similar look and feel, in order to reduce training requirements, e.g. the page list shows a list of defined web pages, clicking on a name will show the details about the web page, edit will bring you to the page edit screen, or add will allow you to add pages.

This is the top part of the page edit screen, where you can enter the file name to give the web page, a short name to appear in the menu bar, a longer description, who maintains the page, and the order this page should appear in the menu.
You also have a drop-down list of pages, or 'Top-page', - this is where you can define the 'parent' of this page. In this way, you can define a hierarchy 'tree' of pages.
The bottom part of the page is the actual editor screen - which is WYSIWYG (what you see is what you get). The following facilities are available within the editor:
- Style (heading level)
- Font
- Font size
- Bold / Italic / Underline
 Paragraph justification
- Horizontal bar
- Number or bullet points
- Indentation
- Font colour / font background colour
- Table manipulation - create table, cell colour, border width, column width.
- Define hyperlink
- Insert graphic
 When editing a page, you can click on the XDBCMS menu bar, and under the 'Website Details' menu, you'll find sections to define the website header, footer, categories of uploaded file, the file upload facility and the image browser, shown here.
The image browser appears in a separate window, and you can drag and drop your graphics into your web pages.
When you upload files, you assign them to a category, which allows you to cut down the list of graphics appearing in the image browser to a manageable level. (You can select different categories from the pull down list at the top of the window).
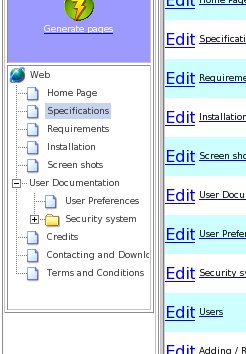
When pages are shown, the structure of the website is shown in the left hand menu bar. Clicking on the '+' and '-' expands and contracts the tree.
Clicking on any of the pages allows you to view the contents of that page.
Built using XDBCMS